
Some quick maintenance on your bike and essential riding gear before the season begins or during is important and will improve your overall riding experience. One of those pieces of gear that seems to wear out quickly are the cleats on your cycling shoes. Here’s how to remove the old cleats and install new, replacement cleats easily, efficiently, and safely in about 10 to 15 minutes.
Reason for Changing Your Cycling Cleats
Once the cleats on your cycling shoes begin to wear or are worn out, you should make a point to change them as soon as possible. The reasons to change them are pretty clear.
- Your own safety.
- A better overall riding experience.
- Cleats allow your foot and knee degrees of movement, which is called float. Many cycling cleats (depending on the brand) allow anywhere from 0, 4, 6, 9, or unlimited degrees of float. If your cleat is worn, your foot may turn too far to the left or right, which can cause undue stress on your knees.
Telltale signs your cleats are worn and need to be replaced are a squeaking sound you’ll hear with every rotation of your cranks. Another good sign is the sensation that you are not fully engaged with your pedal, which means your foot could slip out of or off the pedal during a hard effort. With a healthy cleat, you should notice a firm click when you engage with your pedal.
Why Do Cleats Wear Out?
Cleats can wear out for various reasons, but primarily they get worn from time and usage. Cleats are made of either a hard plastic, metal, or a combination of those two materials.
Specifically, cleats wear out from the action of clipping in and out of your pedals and from walking on them.
Even a short walk can cause cycling cleats to wear down more quickly. That’s why it’s a good idea to invest in a pair of cleat covers, so if you must be off the bike for any reason, you can save your cleats from damage (more about that a little further down in this post).
People tend to think, “These are shoes, shouldn’t I be able to walk in them?” Well, yes and no, but primarily no. The shoes we wear as bicyclists are a piece of equipment to enhance the act of riding, sort of like bib shorts. Any walking that you do should be short. For instance, from the point where you put on your shoes to the point where you get on your bike, anything longer causes potential wear and damage to the cleats.
So, the word “shoe” is a bit of a misnomer. A cycling shoe’s primary function is to connect you to the bike and to enhance your pedal stroke along with giving you more power. That is why the soles of cycling shoes are either a hard plastic or carbon fiber.
Types of Cleats
Cycling cleats come in a few varieties and are made of different materials. The type of cleat you need is based on preference, the type of shoes you have, the bolt pattern on the bottom, and the amount of float you desire.
If you have been riding a long time, you might want to use a cleat with less float. If you are a beginning road cyclist and you want to give clipless pedals a try, I’d recommend a cleat system with a lot of float so you don’t wreck your knees until your fit to your bike is more dialed-in.
There are three major cleat and pedal types on the market, so the one you choose to use should be based on your level of experience and preference, but they are as follows:
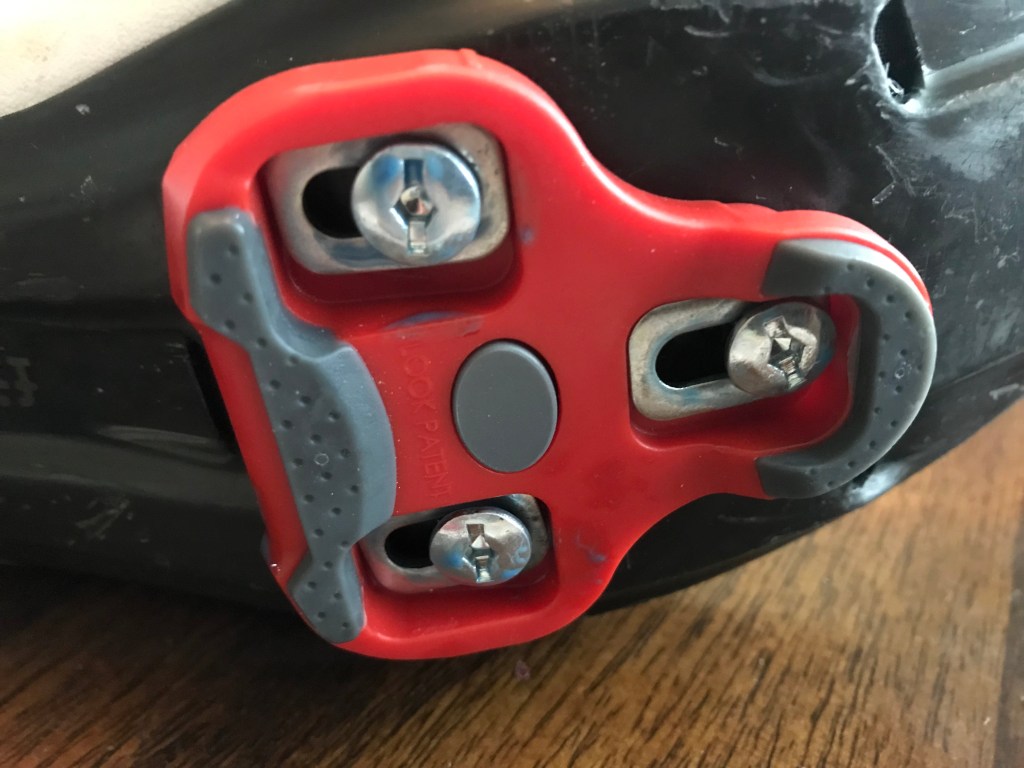
- Look – Look is a French pedal maker. Their first pedals were the delta which were aluminum and required a plastic cleat and a shoe with a three-bolt pattern. In 2004, Look released the Keo pedal in different materials with a redesigned cleat. The great thing about Look pedals and cleats is the company offers three types of cleats with different degrees of float (9, 4.5, and 0). Look style pedals require the rider to kick the pedal forward while riding before clipping in.
- Shimano – In addition to all the cycling products the company makes, it also makes pedals, which it has been doing since 1990. Shimano labels their pedals as SPD (Shimano Pedaling Dynamics) and they produce a two bolt metal cleat for both mountain bike and road bike shoes. Much later, the company started to produce a Look-style pedal and cleat system for road use. The major difference, however, is that the road cleat only offers six degrees of float.
- Speedplay and others – These are great pedals for beginners to learn how to ride a clipless pedal system. Speedplay pedals allow for dual-sided entry into the pedal, so a rider can easily clip-in during the rotation of the cranks.
Typical Cost of Cycling Cleats
Any new pedal system you buy will come with a set of cleats. If you already have a pair of cycling shoes, just make sure the pedals are compatible with your bike and that the cleats are compatible with your shoes.
As mentioned above, many cleats use a three-bolt system if your pedals are a Look/ Shimano style. Speedplay cleats require a four-bolt system and, in my opinion, are more difficult to install and adjust.
Replacement cleats will come with a new set of screws and washers. The cleats themselves can be anywhere from $20 to $40, it all depends on which brand you choose. Sometimes you might find a lower price online at places like Amazon, but after tax and shipping gets added, your savings will be minimal.
Removal of Old Road Cleats

The process of removing your worn-out cleats from your road shoes is fairly easy and only requires a flat head screwdriver or, sometimes, a small hex wrench. The only problem you may encounter is if the screws holding your cleats to your shoes are damaged, which occurs more frequently than not, especially if you tend to walk in your cycling shoes. If that is the case, a larger flathead screwdriver that allows for more torque and pressure into the screw usually works. Word of caution: If you attempt this, be careful not to strip the screw or the screwhead.
Flattened or damaged screw heads are another good reason to use cleat covers, which can cost about $15.00 or less for a pair of Look Keo covers. The ones made by Look, though, aren’t great. They are made from a hard plastic and can be slippery to walk on. I use generic covers made for Look Keo cleats. They are rubber, which are more flexible and also offer ease of walking without the potential for slipping on a smooth, damp, or wet surface.
Installing New Cleats
Once you have removed the old cleats, this is an opportune time to clean your shoes of any road grime or grease. I’ve found magic erasers and little bit of dish soap works well. It’s especially good if you can clean the bolt holes and screw threads, perhaps with a Q-tip.
Once you’ve completed the cleaning process of all the bolt holes, it’s time to install the new cleats. If you are using a Keo cleat, it offers a way to mark where your old cleat was installed. However, I don’t rely on that. Instead, I make sure the cleat is pushed all the way forward, which means the ball of my foot will be over the axle of the pedal. Ideally, this what you want to get the most power from your pedal stroke. But cleat placement is a matter of personal preference, so you should install the cleat in the position that feels best to you.
Next step is to install the screws. However, before installing the screws, put a dab of grease in each bolt hole, then apply Loctite Blue 242 threadlocker to each screw. This is an all-important step. Even if you install the screws to a point of tightness, eventually the force and tension required to clip in and clip out of your pedals will cause those screws to loosen over time, which can cause multiple issues, not to mention the potential for losing a screw. Loctite holds those screws solidly in place.
Once you have applied the Loctite to your screws, install the screws. Don’t screw them in all the way, but enough to hold the cleat in place so you can add the other screws. Once all the screws are inserted in the shoe, then move the cleat to your optimal position and secure each screw. Repeat the process for the other shoe and you’re all set. It takes 24 hours for the Loctite to dry and set around the screws, so I wouldn’t suggest changing your cleats the day of a ride or race.
Conclusion
Changing out the cleats on your road shoes is a necessary process, and once you have done it a few times, it goes quickly. There’s nothing like a new set of cleats on your road shoes to enhance your ride experience. Plus, it is one of the easiest maintenance items to perform short of oiling your chain.


